Hooq help centre
How to set a Parent from a text field
Goal
Set the Parent of the copy of a work item from a single-line text field on the original. Your own Jira Automation (or any other way you fill the field) puts the key of the parent work item in that field. Hooq copies the text into the Parent of the copy.
How it works
- Your automation decides the key. Hooq does not look for a parent and does not choose one. It trims the spaces around the text and hands it to Jira as the parent.
- The key must be the key of the parent work item on the destination instance, the instance that receives the copy. A key from the sending project is wrong.
- Use a single-line text field on the sending side, and set the direction towards Parent only.
- This is a field mapping like any other. Hooq's own handling of the parent of a work item is separate and is not changed by it.
Steps
Open Hooq, select Open in the row of your Hooq, open the Configuration tab and then the Fields tab. Switch to the Draft view (see Publish and start if the Hooq is already published).
You should see: the table of mapped fields and the button + Field Mapping.Select + Field Mapping.
You should see: a window called Create Field Mapping with a field list for each project.On the sending side, choose your single-line text field (1 in the picture). Leave the mapping type as Passthrough.
In the middle, choose the direction that points from the sending project to the project that receives the copy (2).
On the receiving side, choose Parent (3).
You should see: a line of text below the fields: The text must be the parent issue key as it exists on the destination instance. Your own automation decides it; Hooq only passes it on. Use a single-line text field and choose the direction towards Parent only. The line only appears when Parent is the field that receives the value.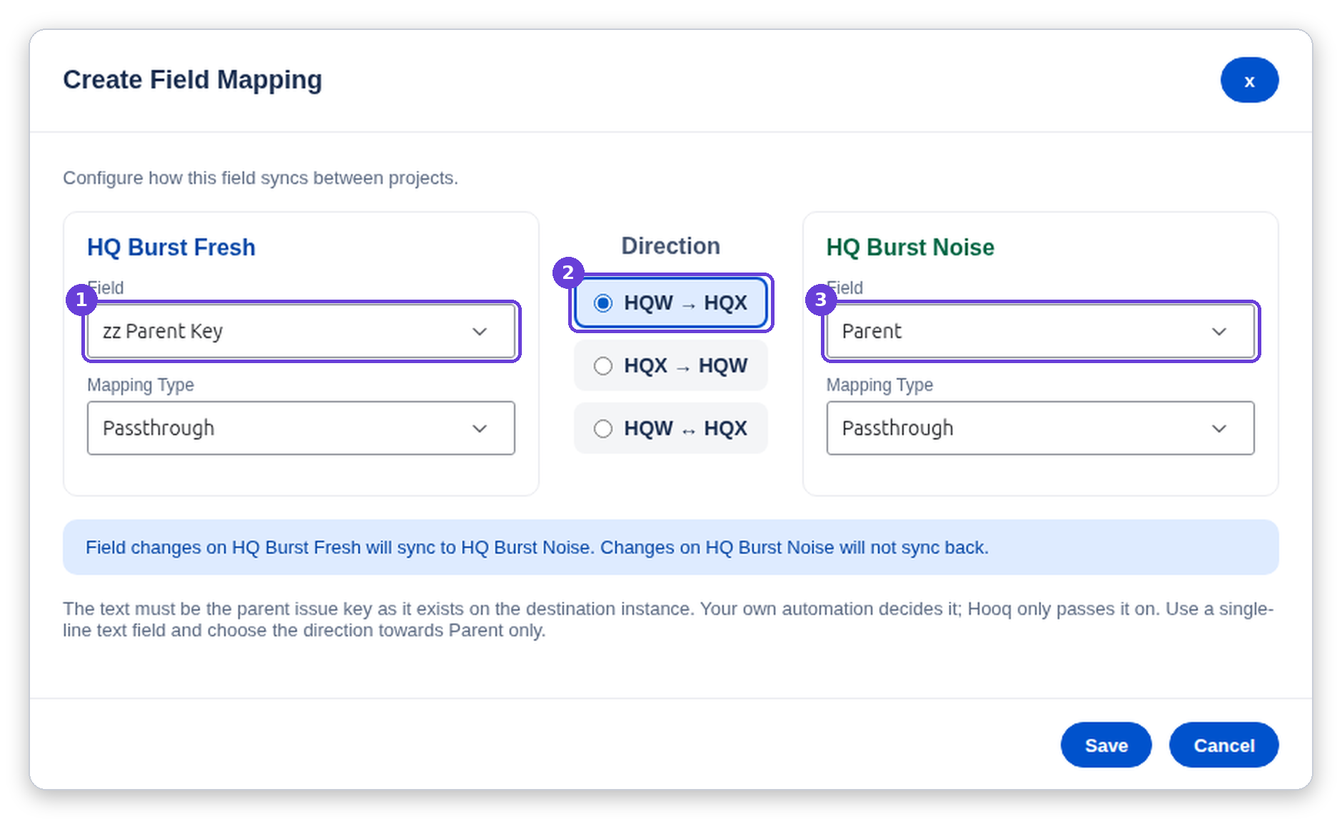
The Create Field Mapping window with the text field (1), the direction (2) and Parent (3).
Select Save, save the tab, and select Publish Draft. If the Hooq is stopped, select Start Hooq.
If Parent is not in the list
Hooq shows the fields it stored when the Hooq was set up. If Parent is missing, the stored project details are old. Open the Hooq tab of the Hooq, select Refresh Project Details and wait until it finishes. Then go back to the Fields tab and select + Field Mapping again.
Expected result
- When the text field holds a valid key, a new copy is created under that parent, and a later change of the text moves the copy to the new parent.
- An empty text field, or one with only spaces, creates the copy without a parent. When the text is emptied later, the parent of the copy is cleared.
- Upper and lower case both work, and spaces around the key are removed.
- The original work item never gets a parent from this mapping.
This was checked with two projects on one instance.
Rules to know
The errors show in the Troubleshooting tab. Correct the key on the original work item. The fields of the failed edit are not sent again by themselves: change them again, or use Resync, after you correct the key.
Common mistakes
- Putting the key of the sending project in the field. It must be the key of the parent on the destination instance.
- Using a multi-line text field, a drop-down or a user field instead of a single-line text field.
- Choosing both ways or the direction away from Parent. Choose the direction towards Parent only.
- Expecting Hooq to find a parent by itself. Your automation must fill the field.
- Forgetting Publish Draft after you save the mapping.
Related pages
Want to raise a ticket? Click here (opens in a new tab)