Hooq help centre
Create a Hooq
You create a Hooq from the Hooq page: Jira Apps, then Hooq. The page lists your Hooqs with their Name, Description, Status (for example Running or Stopped) and Draft state (Draft or Published). While the list is loading it shows Loading Hooqs..., and a Draft state that is not known yet shows a dash (—) instead of a word. A running Hooq is never shown as Draft because of a slow load; the list fills in row by row. If the list cannot be loaded, the page says The Hooq list could not be loaded. It is retried automatically., or Your session has expired. Reload the page to continue. when your Jira session has ended.
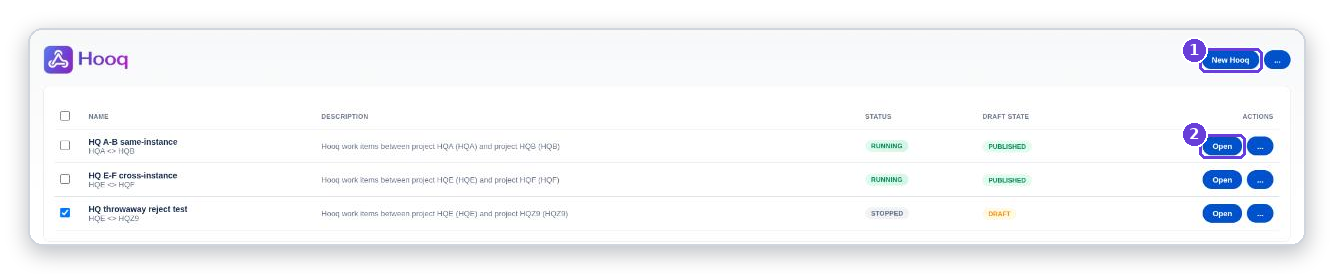
The Hooq overview. Select New Hooq (1) to create one, or Open (2) to work on an existing Hooq.
Create a Hooq between two projects on this site
Select New Hooq.
You should see: a window called New Hooq with two choices.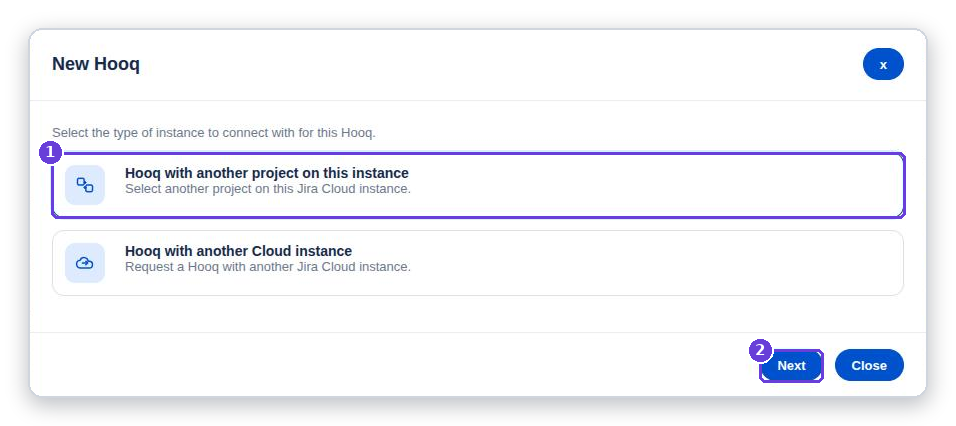
Step 1. Choose the kind of Hooq (1), then select Next (2).
Select Hooq with another project on this instance, then Next.
Type a Hooq Name (required). You can add a Description (optional) of up to 255 characters. Choose the First Project and the Second Project, then select Create.
You should see: your Hooq in the list with the status Stopped and the draft state Draft (a dash may show for a moment while the state loads). Create stays grey until the name and both projects are filled in.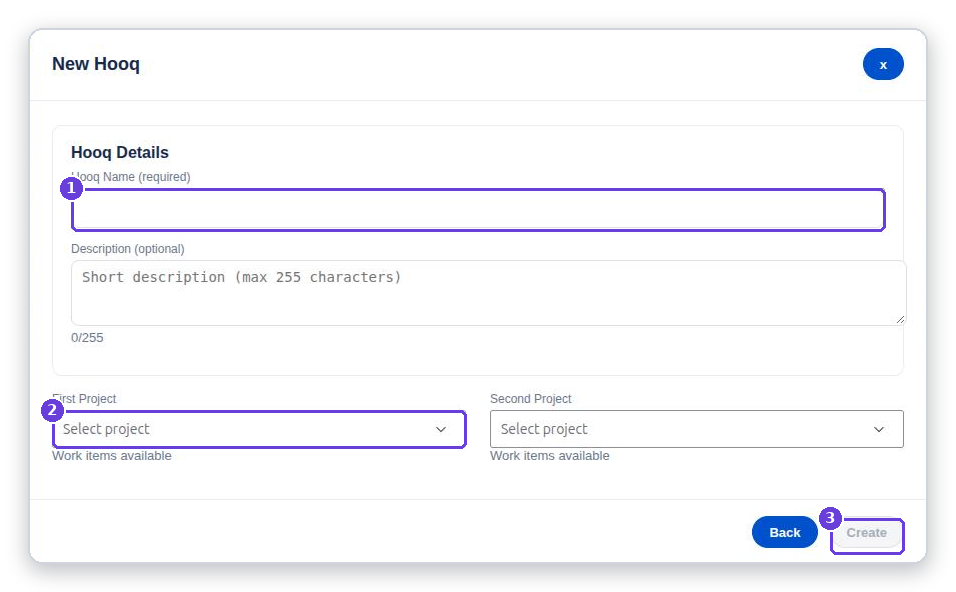
Step 2. Name the Hooq (1), choose both projects (2), then select Create (3).
Select Open in the row of your new Hooq to continue with Work types and the other tabs.
Create a Hooq with another Jira site
Do this only after the connector is Active (see Connectors).
Select New Hooq, then Hooq with another Cloud instance, then Next.
Type a Hooq Name (required) and, if you like, a description.
Under Your Instance choose the project on this site. The Base URL of this site is shown and cannot be changed.
Under Partner Instance, choose the site in Partner Instance URL, then type the Project Key of the project on the other site.
You should see: a note that explains that by sending this request you allow the partner site to view your space configuration, including all fields. If the list of partner sites is empty, the window says No partner instances available. Add one in Global Settings to continue.Select Create.
You should see: the Hooq in the list with the status Stopped and the draft state Draft.Select Open. The header shows Publish this Hooq before starting the sync. and the Hooq tab has a Request Approval button. Select it.
You should see: Approval request sent to ... Waiting for approval.On the other site, an administrator opens Hooq. The same Hooq appears in the list. After Open, a banner says Incoming Hooq request from ... with the buttons Approve Hooq and Decline. They select Approve Hooq.
You should see (on both sites): the tabs Hooq, Configuration, Notifications, Migration and Troubleshooting.
Other actions in the list
Select ... in a row for Rename Hooq, Disable Hooq and Delete Hooq. A Hooq you delete stays gone from the list. For a Hooq with another site, the new name and description are sent to the partner site as well. At the top right, ... next to New Hooq opens Getting Started and Settings.
Common mistakes
- Typing the wrong project key for the other site. Check the key in the other site before you create the Hooq.
- Starting before you publish. See Publish and start.
- Choosing a connector that is not Active.
Related pages
Want to raise a ticket? Click here (opens in a new tab)